|
If the title did not make it apparent, this post is all about wood! Part of the lab activities this week included the examination of woody tissue. Before I get into the really cool stuff, I am going to introduce some terminology. There are various ways that a cut can be made through a piece of wood, and each one gives a different perspective of the internal structures. The main types of cuts are the cross-section, radiate section, and tangential section. Here is a quick breakdown of the cuts, and what makes them unique. The cross-section is a complete cut through a “stem” at a right angle from its axis (the longitudinal surface of the stem). This stem can be as small as a twig or as large as an entire tree trunk! The radiate section is a longitudinal cut through the center of the stem, and the tangential section is a longitudinal cut that does not go through the center. Examples of all these cuts can be seen in Figure 1.1 below.  Figure 1.1: This figures shows the three main cuts used for wood. Photos by Michael Belcher. Figure 1.2 (see below) shows one of the great “tree cookies” we had available to examine during lab. It allowed for us to view all of the essential parts of a tree, both living and dead. This image is labeled to show the various components and tissue systems that make up the trunk. The tree in the image is ring porous. This means the annual growth can be seen as rings. The cells of this region (xylem) carry water and nutrients from the roots to the leaves. These cells get very large during rainy seasons to compensate for the increased water flow. Therefore, these cells are also smaller during the dry seasons, and this combination yields the rings seen in the cross section. By counting the rings, I estimate this tree was ~42 years old when it fell. 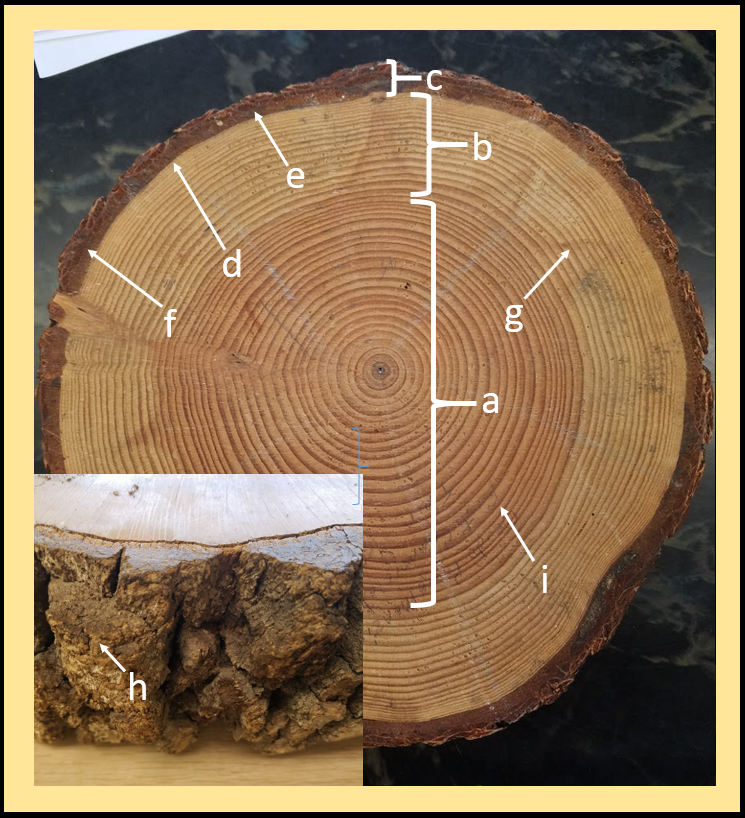 Figure 1.2: a-Heartwood, b-Sapwood, c-Periderm & Phloem, d-Vascular Cambium, e-Phloem, f-Cork Cambium, g-Xylem (parencyma) Ray, h-cork, i-annual ring. Photos by Michael Belcher. I want to make another point with Figure 1.2 before moving on. The cross-section shown is ~55cm in diameter. The section of the trunk labeled “c”, the periderm & phloem, is maybe 3cm across. What is amazing is that this section is the only “living” part of the trunk! The cells that make up sections “a” and “b” are actually dead when mature, making the majority of the tree dead! Before concluding, I want to show some more detail into what “ring porous” is all about. I briefly stated earlier that the size of the water conducting cells change as the amount of rainfall changes. Figure 1.3 is a great example of how this looks at under the microscope. This figure shows a cross-section of the secondary xylem of Quercus or Oak. It is very easy to differentiate the early and late wood by the size of the cells, with early wood being much larger. This is due to the large amounts of water and nutrients available in the Spring, or beginning of the season. 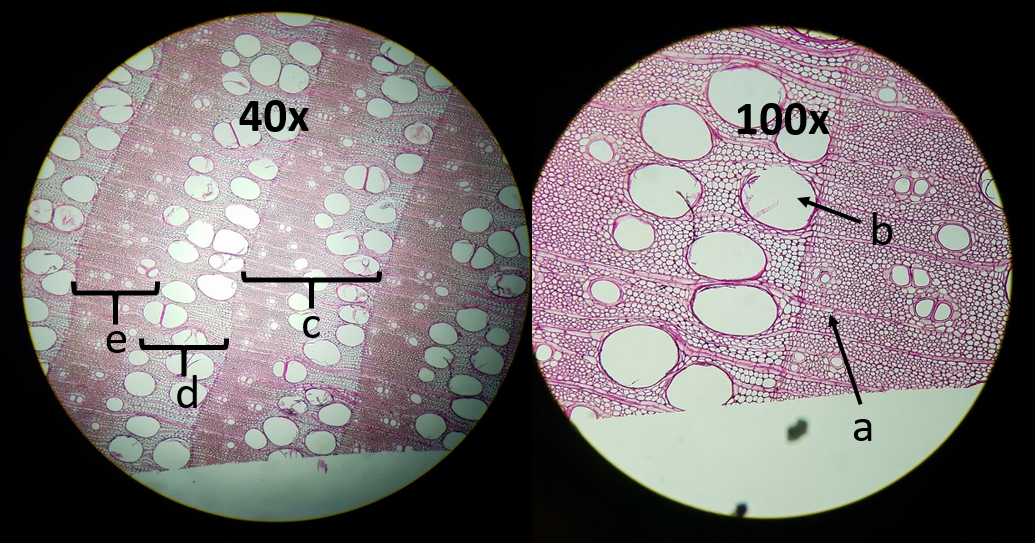 Figure 1.3: These are images of a prepared slide of the secondary xylem of Quercus . a-Parenchyma Ray, b-Large Vessel Element, c-1 Year Growth, d-Early Wood, e-Late Wood. Photos by Michael Belcher. With these microscope slides it is easy to see how the rings of a tree form! I hope you learned something. Cheers! Post by Michael Belcher
0 Comments
Leave a Reply. |
AuthorContent is created by students participating in the Plant Structure course at Oregon State University for Winter 2017. Archives
March 2017
Categories
All
|
 RSS Feed
