|
The Technique For Staining: The process of staining potatoes and onions was quite simple – and only took a few laboratory tools. It required:
Once we had our onion epidermis and photo slices we placed the plant material on the slide. Then we placed the dye on the plant material and left it to sit for 2-4 minutes. After, we drew off the excess dye with a kimwipe. Following with ethanol to wash off excess dye, again drawn off with a kimwipe. After, calcium chloride was added and a cover slip was placed on the slide. 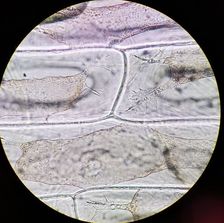 For the onion we dyed it using CVA. CVA will stain lignin violet and cellulose yellow. In this figure, we can see that onion showed the violet pigment in the cell walls of the onion – which was inspected. Also notice the beautiful vacuoles that are clear in the cell! Stained Onion Cells at 400x Magnification Photo by Melissa Clark and Cierra Walker 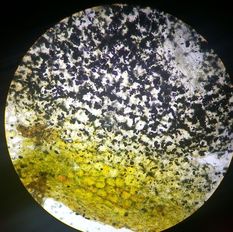 The potato was stained with iodine – iodine would highlight starch within the potato cells. We were lucky enough to look at a greening part of a potato! This meant that some of the potato’s cells has begun the process of switching amyloplasts to chloroplasts. Amyloplasts are specialized plastids for starch storage. It’s easily observed in the shot above that as the amyloplasts change to chloroplasts – they lose their capacity to store starch! Notice how the dark black spots fade to green-stuffed cells! Stained Potato Cells at 100x Magnification Photo by Melissa Clark and Cierra Walker Staining Plant materials was not and is not a difficult task - and in doing so, you can make certain cellular components more visible!
0 Comments
|
AuthorContent is created by students participating in the Plant Structure course at Oregon State University for Winter 2017. Archives
March 2017
Categories
All
|
 RSS Feed
