|
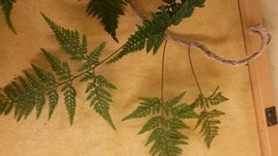
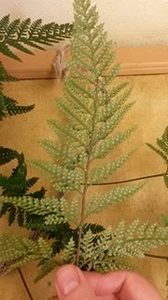
In Lab 13 (“Flowers”), we looked at Fern fronds. The large fronds are the sporophyte generation of the fern, and underneath the fronds, in a linear tribal-face-paint-like pattern that would make any burning man participant jealous, are the sori. Each sorus is a group of immature sporangia that will eventually undergo meiosis and give rise to the gametophyte generation. Under the dissecting scope, the sori are clearly seen to be masses of sporangium, covered by a transparent indusium.
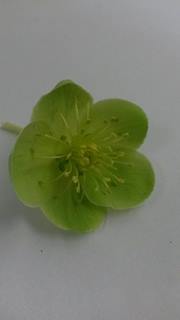
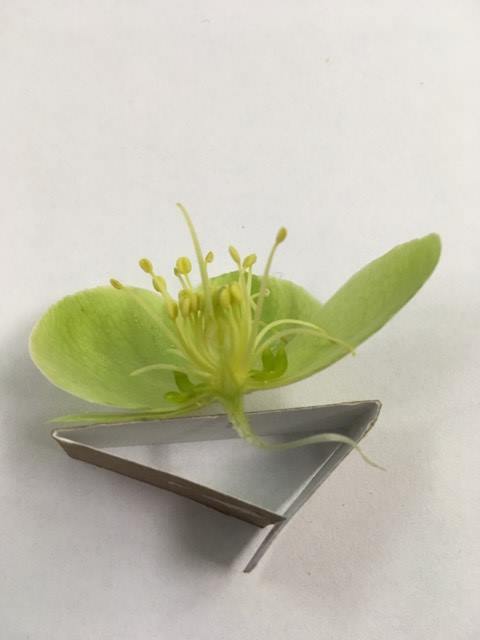
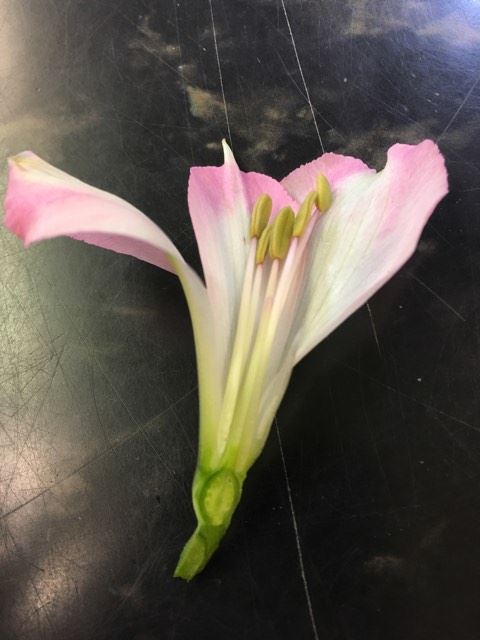
 Sori under the dissecting scope with indusium coverings. Picture taken by Jena Ozenna. We also looked at a variety of flowers. We identified the different parts of a flower and different forms a flower can take. Flowers can be classified as perfect (possessing both male and female sex organs) or imperfect (possessing either male or female sex organs), and complete (possessing all parts of a flower) or incomplete (missing a few parts) As a wise woman once said (cough.. Dr. L.-P…), flowers show us that it is possible to be perfect AND incomplete (cue group “Awww”). Images below: LEFT: Helleborus flower, dicot, perfect and complete. Picture taken by Katie Pardee MIDDLE: Cross-section of carpel, superior ovary (other flower organs are attached below the ovary). Picture taken by Jena Ozenna. RIGHT: Cross-section of the Alstromeria flower, monocot, inferior ovary (other flower organs are attached above the ovary). Picture taken by Jena Ozenna. -Katie Pardee
0 Comments
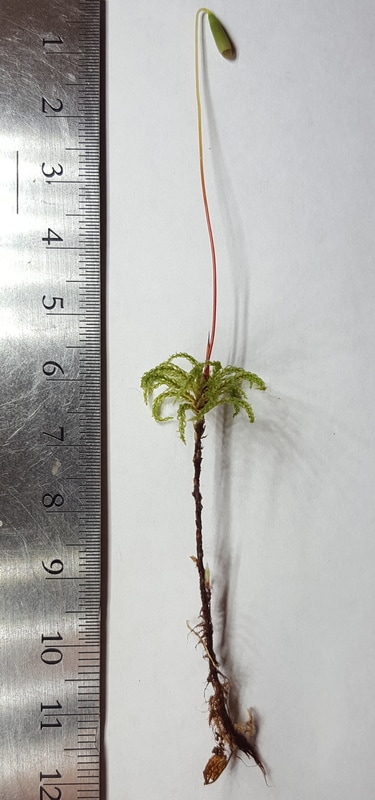
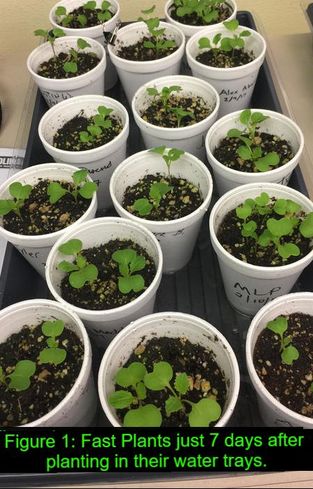
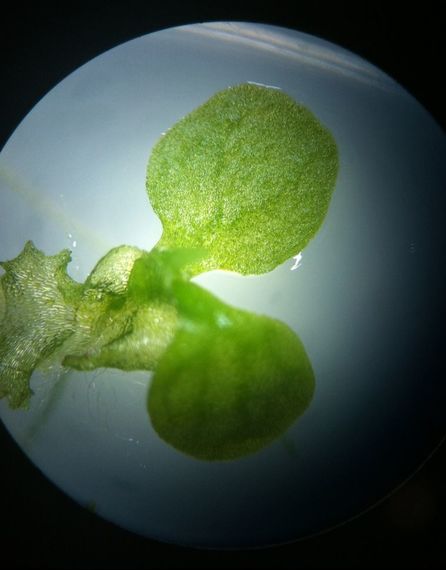
Submission by Jena Ozenna In lab this week, the main focus was flowering plants in comparison to the sporangia of mosses and ferns. To further understand the anther of angiosperms, we viewed prepared cross-section slides of Lilium anthers at both young and mature stages. 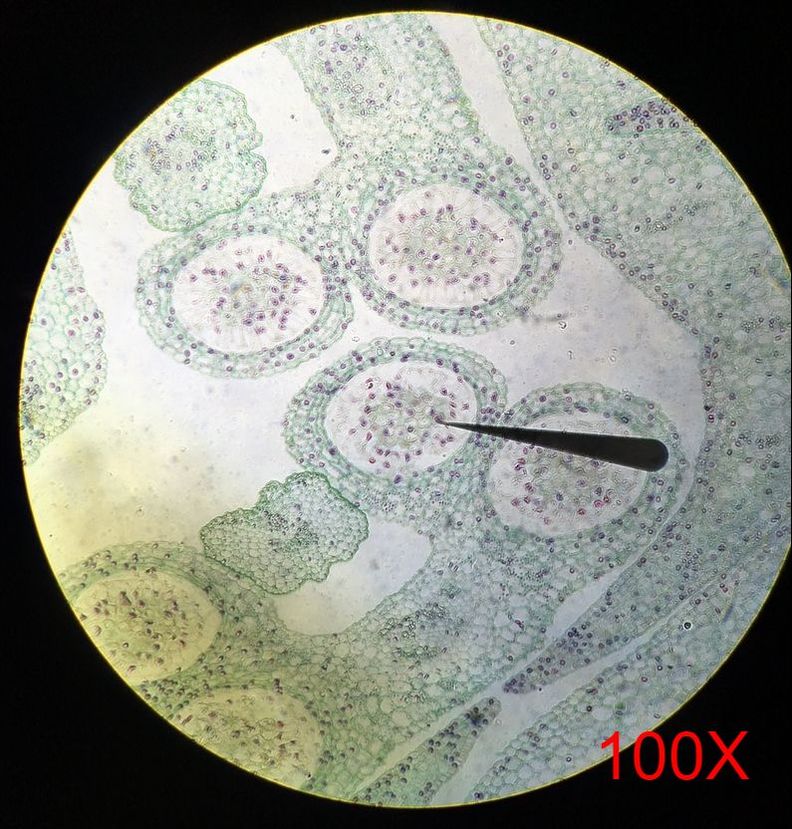 Prepared slide of diploid Lilium microspore mother cells sporogenous tissue inside microsporangia. Photo taken by Jena Ozenna. 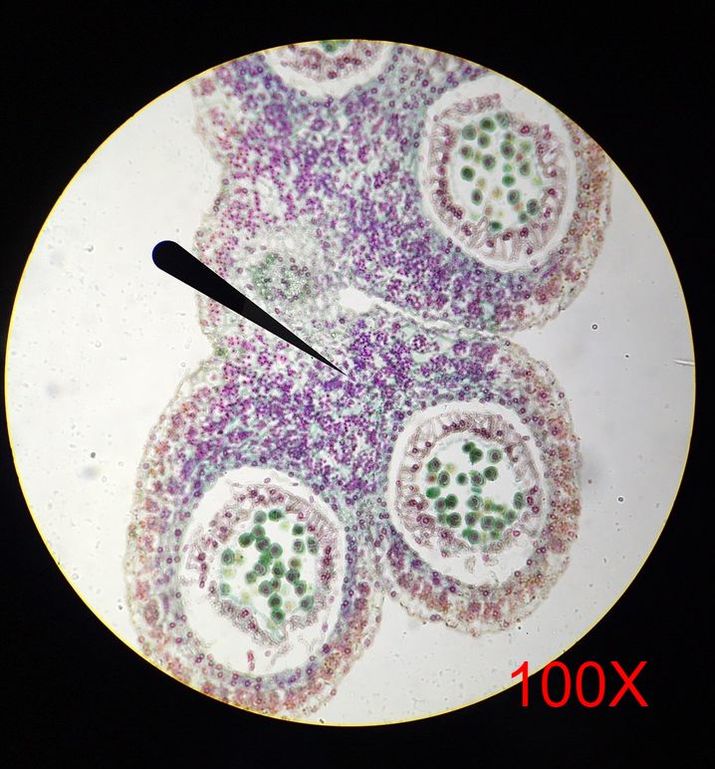 Prepared Lilium anther cross-section microspores in a tetrad after meiosis. Photo taken by Jena Ozenna. 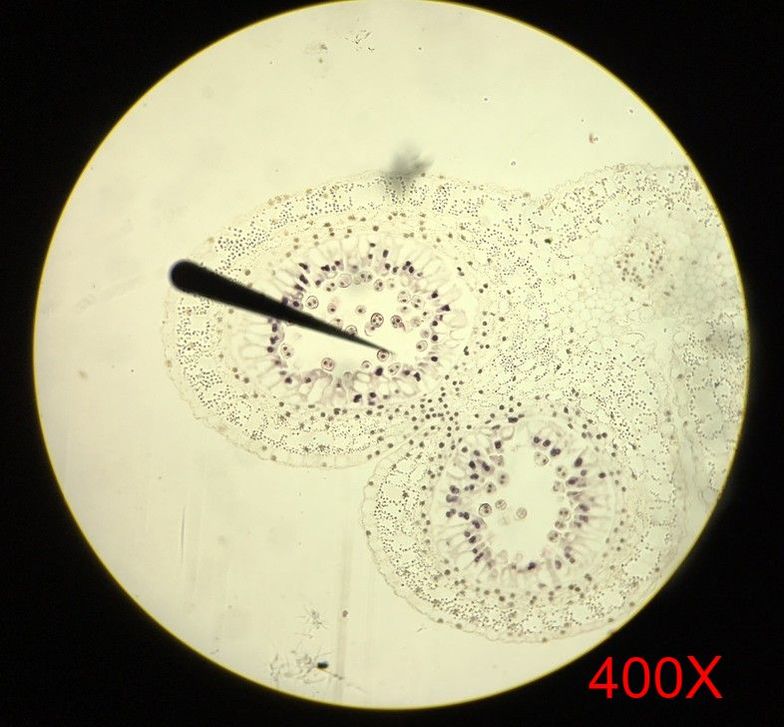 Prepared slide of Lilium anther cross-section microspore tetrad englarged. Photo taken by Jena Ozenna. 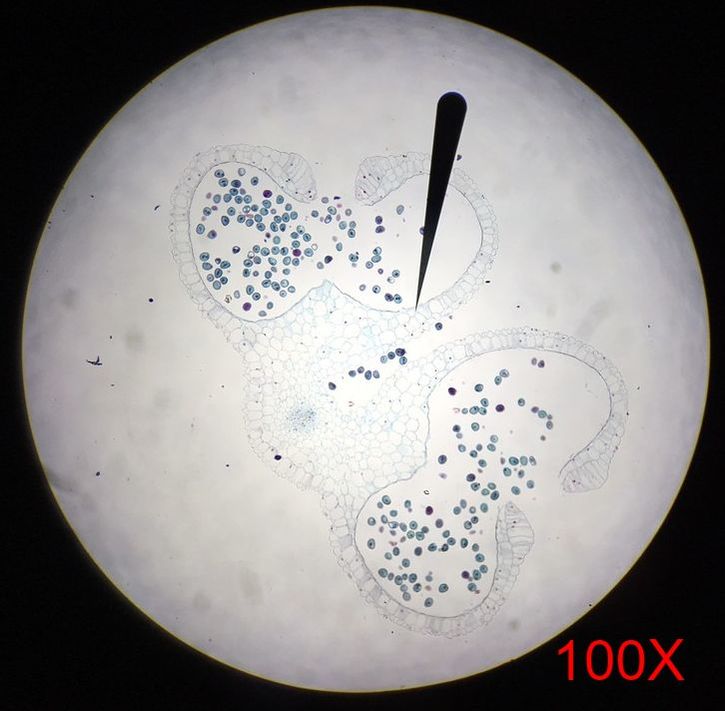 Prepared slide of mature Lilium anther cross-section where the microspores have undergone mitosis and formed an immature male gametophyte. Photo taken by Jena Ozenna. 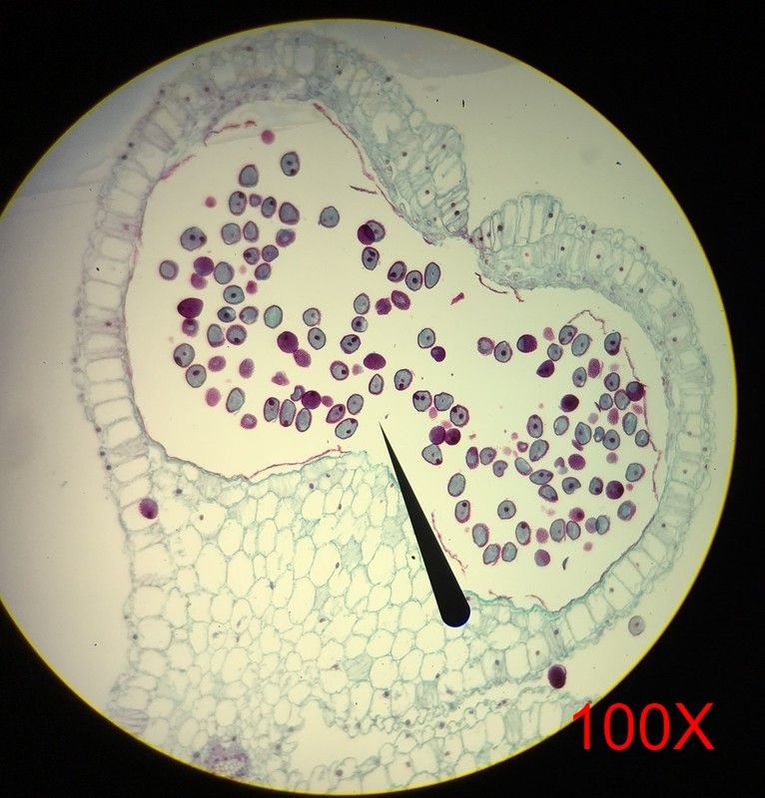 Prepared slide of mature Lilium anther cross-section where the immature pollen (male gametophytes) is now two cells large. Photo taken by Jena Ozenna. Additionally, we observed the Wisconsin Fast Plants at 14 days of growth. The Wisconsin Fast Plants were planted on 9 February 2017. The plants were not pollinated at this point due to the stage of development. 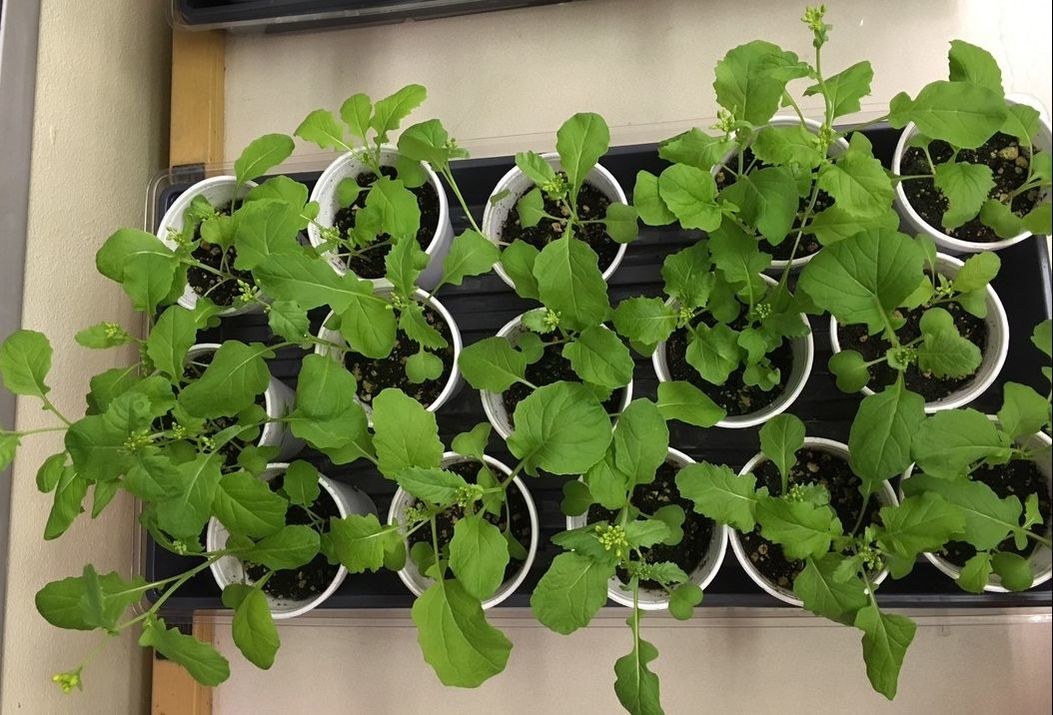 Aerial view of Wisconsin Fast Plants at day 14 of growth. Photo taken by Jena Ozenna. 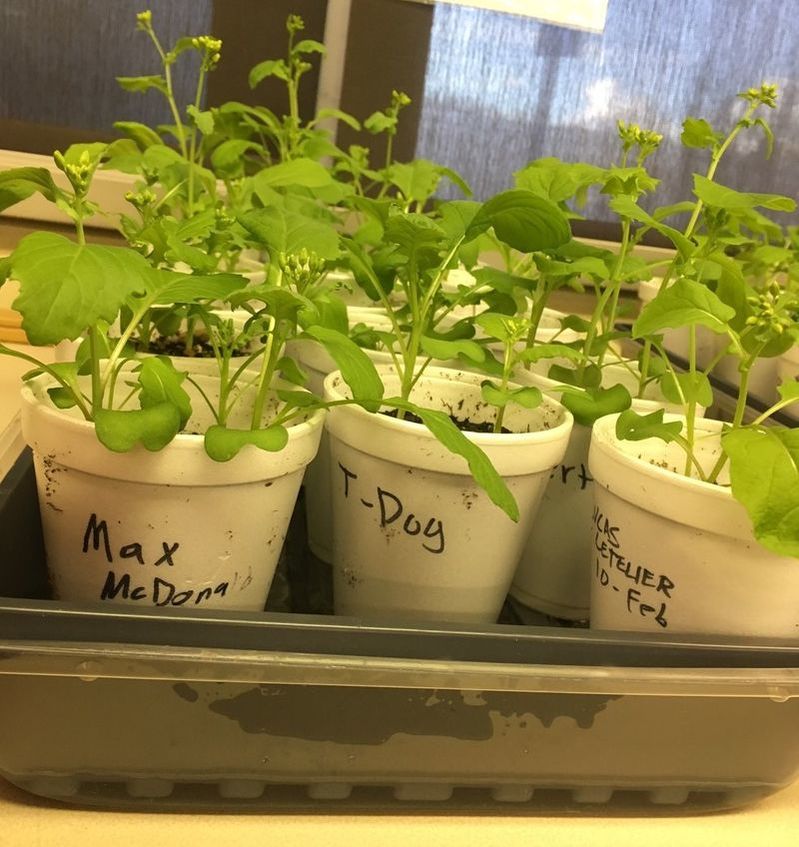 Side view of Wisconsin Fast Plants at day 14 of growth. Photo taken by Jena Ozenna. Submitted by Lucas Maria Keoni Letelier The diversity of Oryza sativa L. is an oft forgotten yet definitive human concern. Our partnership with this group, lasting thousands of years, has seen the drawing out of the best qualities of the plant and the development of some of the more regrettable practices in the animal. Now, our actions have restricted our ability to cultivate some of our more popular varieties of rice and we must turn to obscure strains in order to develop new breeds combining high yields with salt and drought tolerance. In a warming planet, where unsustainable agricultural practices are steadily salting our soil, these qualities could expand our food production and provide one solution to an ever-looming, multi-faceted food crisis. In order to select the correct candidate in this breeding project, it is important to have a solid understanding of the traits that we are seeking out. It is one thing to understand that a plant does well in submerged or saline conditions, it is a different thing all together to know and understand the morphology that allows for this. Enter our class and seven rice varieties, three of which were breeding lines (Nipponbare, IR29 and N22) and four were land races (Kalo gorah, Nona Bokra, Pokkali, and Talmugur). We divided these varieties among the class, and recorded several key features. Of the shoot, we photographed and recorded the length of ligules (Fig. 1), we then took cross sections of the main blade 15cm, 10cm, and 5cm above the collar as well as 5 cm below the collar. These cross sections were stained with toluidine blue and the main veins were counted, as well as the number of aerenchyma chambers, occurence of silica in these, presence of sclerenchma along the abaxial side, and the occurence of abaxial bulliform cells. An example of one such cross section can be seen in Fig. 2. The roots were treated similarly; first the length from the bottom of the pot to the tip of the root was recorded, then the roots were counted and a representative was removed for cross sectioning. In order to understand the development of aerenchyma cavitation in maturing root tissues, cross sections were prepared from the bottom of the pot, 5cm, 10cm, 15cm, and 20cm from the bottom and 2cm from the tip of the root. These were also stained with TBO (Fig. 3) and proportion of aerenchymatous cortex was recorded with a characterization of clustered or diffuse arrangement, where possible. This was likely the most difficult preparation for the Pokkali group as the aerenchyma developed very quickly in these, already being visible in ~80% of tissue at the youngest section (nearest to the tip). At times, it felt like trying to cross section a plastic straw, with lots of splitting and flattening as we went. This data was all compiled online and will be used to elucidate the connections between these traits and the survival of the rice varieties under adverse conditions. Fig 1. The collar and ligule of the Pokkali variety, notice the absence of auricles. (Credit: Alex Abair) 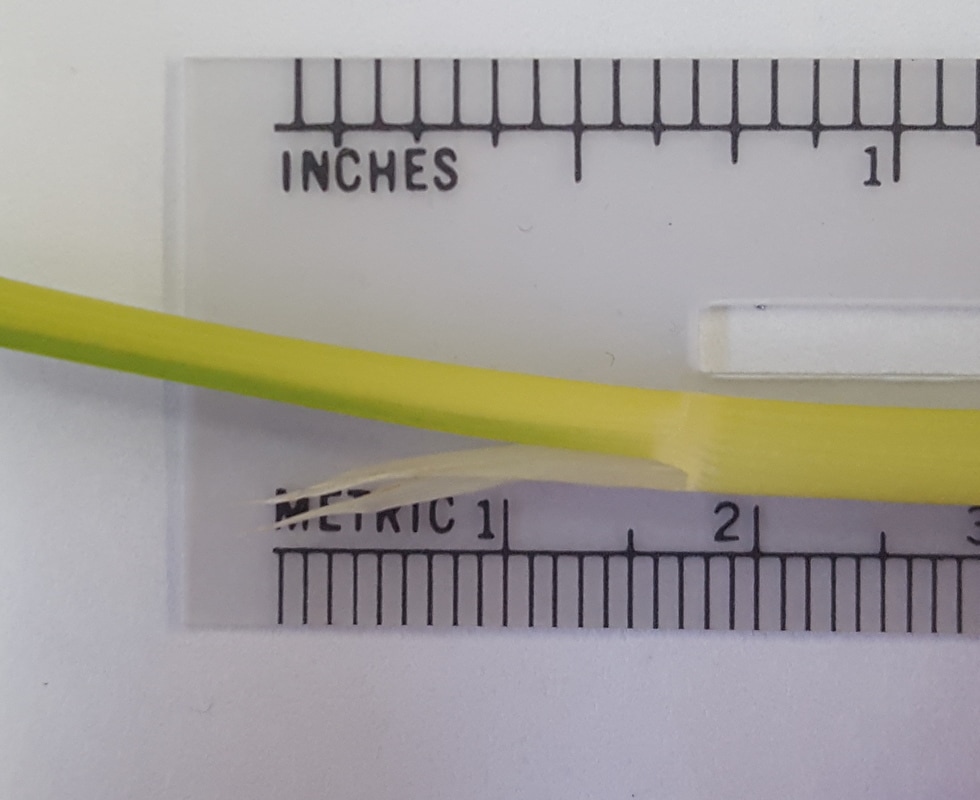 Fig 2. A cross section at 5 cm above the collar of a Pokkali, with silica crystals. notice the asymmetrical lengths of the blade on wither side of the "midrib" (top and bottom). (Credit: Alex Abair) 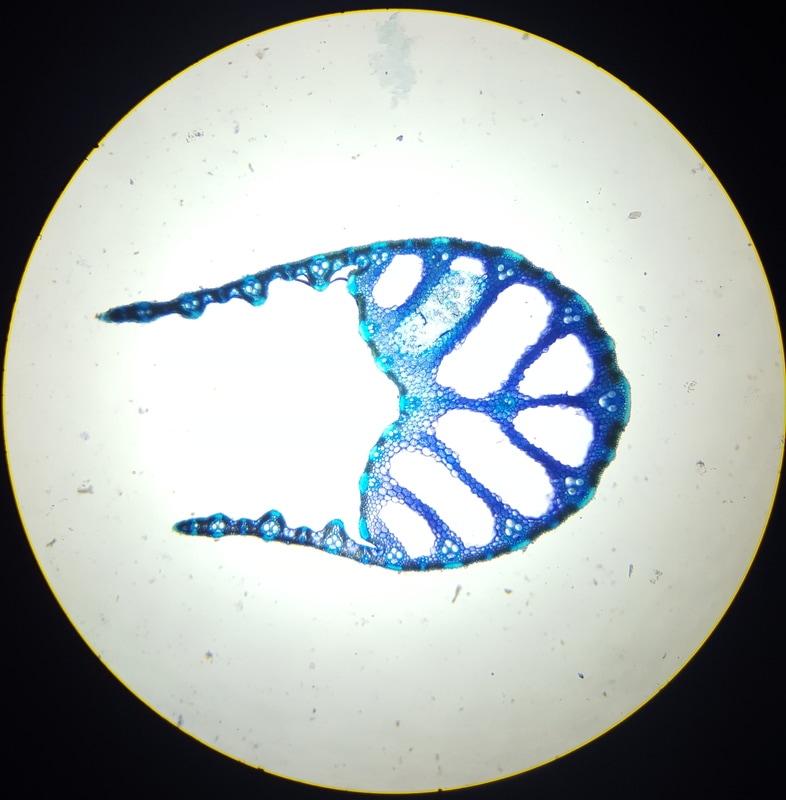 Fig 3. A cross section from the middle of the root (~15 cm from the bottom of the pot) notice the well developed empty spaces within the cortex. (Credit: Alex Abair) 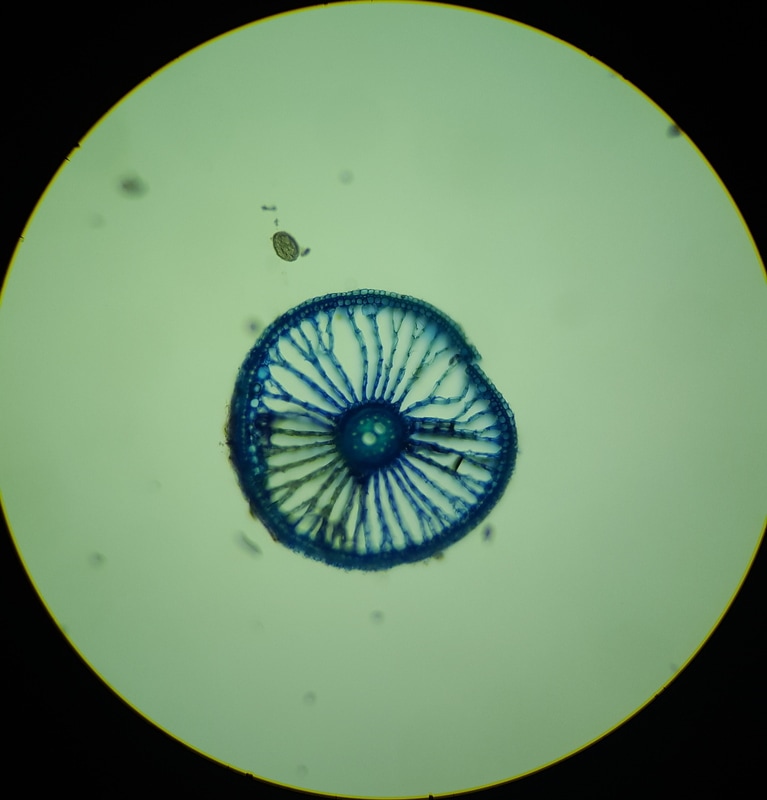
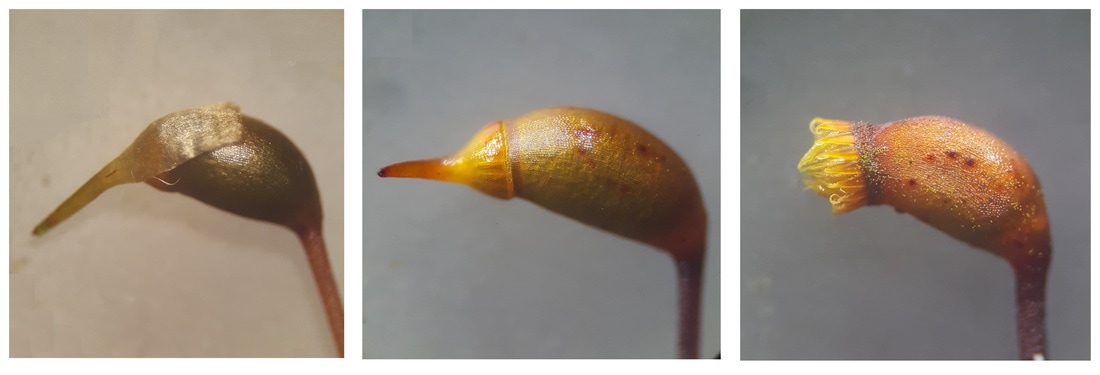 Capsules of unidentified moss photographed at 40x magnification by Alex Abair. The first stage (left image) shows an immature capsule with a sheath called a calyptera. If you find a capsule that’s a little more mature (middle image), it will have lost the calyptera, and an operculum will be visible. This operculum functions as a cap that keeps the spores contained in the capsule. If you find a capsule that’s even more mature than the previous two (right image), it will have lost both its calyptera and its operculum. There will be an opening at the end of the capsule lined with teeth. These teeth are collectively called the peristome, and they regulate the gradual release of spores.
-Alex Abair.
Last Thursday on February 16th, we observed cells undergoing mitosis on onion root tips. This was accomplished by a lengthy process that basically consisted of our instructor giving us "fixed" root tips, which is where cells are actively dividing. They are fixed because mitosis was suspended in the root apical meristem, or the root tip. We took these fixed root tips and put them in a dish labelled "Carnoy Fixative I" for 4 minutes. After 4 minutes, we transferred the root into a dish labelled "Carnoy Fixative II" for an additional 4 minutes. We then cut off about 1 to 2 mm of the root tip and put it on a slide. Once on the slide, we followed typical slide procedure and stained it with TBO. However, when we put the cover slip on the slide, we made sure to press straight down without twisting the cover slip. We then observed the slide under a compound microscope using oil immersion. This is what we saw: 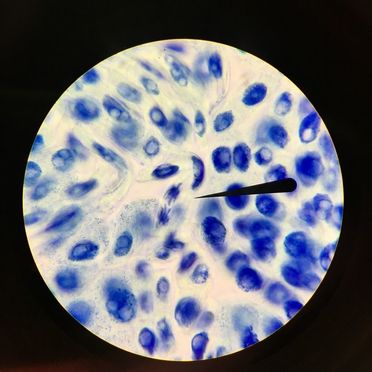 Root tip cell undergoing Anaphase at 1000x. Centromeres divide; each of the chromosomes move towards the opposite ends of the cell. Slide prepared by Chelsea Maddox and photographed by Adalberto Marquez. 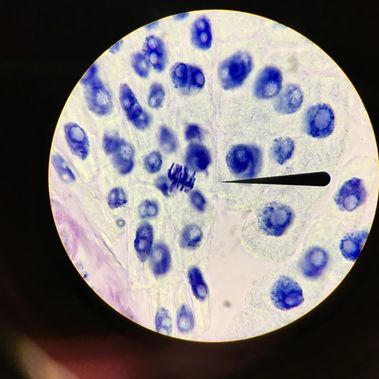 Root Tip cell undergoing Metaphase at 1000x. Chromosomes lineup at the equator of the cell; centromeres attach to spindle fibers. Slide prepared by Chelsea Maddox and photographed by Adalberto Marquez. -Adalberto Marquez
Posted by Amber Eaton.
Submitted by Cameron Ross
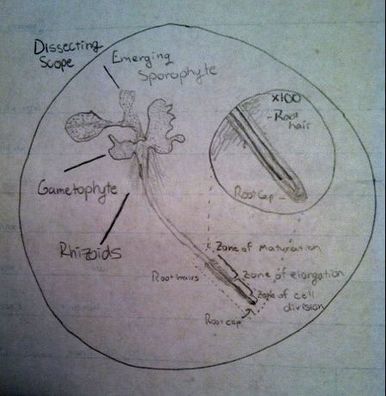
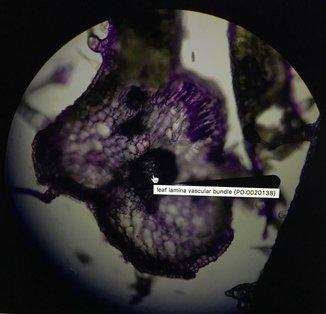
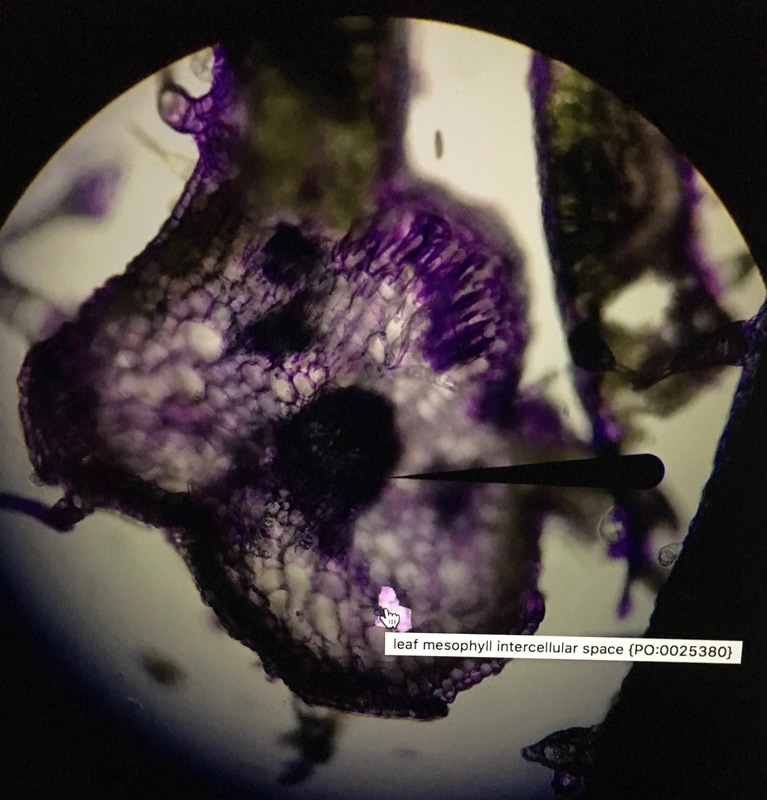
Last Tuesday on February 14th we went to the Library into a room on the 5th floor called the Bernard room. Here, we got into pairs to use one of the many computers in there that had a program called AISO. AISO is a program that's used to annotate images (like cross-sections of leafs) using ontology terms from the website Planteome.org. We used this time to annotate the pictures we had taken for our individual Natural History Projects, and if you ask me, there's no more romantic way to spend Valentine's Day than annotating pictures from our plants. Unfortunately for us, AISO is a fairly old program and has many bugs that makes it hard and frustrating to use. I wasn't able to annotate my pictures properly because of this, but luckily, I think it worked out.
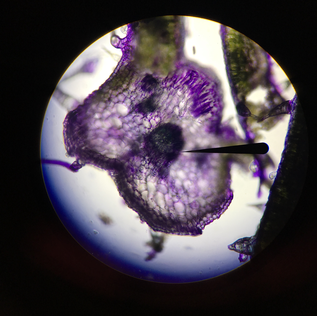
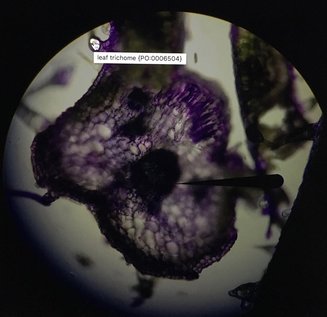
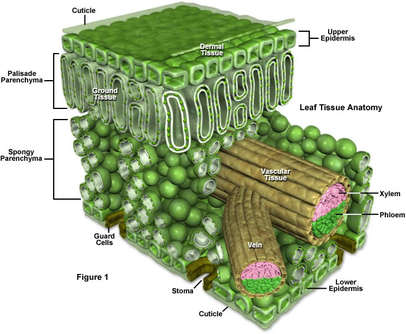 Diagram of dicot leaf. As you can see, I wasn't able to get AISO to properly annotate my image. The trichome came out relatively good, but the vascular bundle wasn't highlighted, although it was annotated. It's a good thing that it's easy to see as it's simply the big, dark spot in the middle. It was also hard to annotate the mesophyll but they're the white spots all throughout. I think a structure I should've annotated (but I didn't realize it was there due to time-constraint) was the palisade parenchyma cells on the top right. These elongated cells contain many chloroplasts and is the layer most responsible for photosynthesis. I showed the diagram of a dicot leaf for reference of what we're seeing in my images. It's good to note my image is slightly out of focus because my slice wasn't cut straight. Overall, this was a great experience and I wish a newer and updated version that fixed most of the bugs for AISO was released. It was a very fun lab nonetheless.
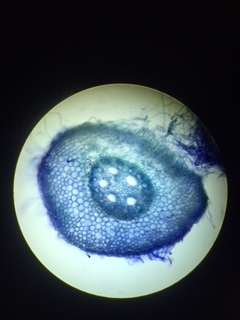
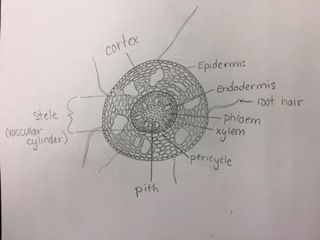
-Adalberto Marquez Submitted by Tyler Yates In lab we examined various roots from two different dicot plant specimens. Pisum Sitivum (pea), and Vicia faba(bean). Cross sections were prepared and examined under a compound microscope. The picture below on the right is a cross section of Pisum Sativum and an annotated image to the left identifies the structural internal components. Notice the external root hairs stained dark blue surrounding the epidermis. internal to the epidermis is the cortex made up of the larger clear parenchyma cells of the ground tissue. The group of cells in the middle is the stele, or procambium. The procambium includes the vascular tissues as well as the pericycle; surrounded by the endodermis. The pericycle, in dicot roots, gives rise to lateral roots, cork cambium, and portions of vascular cambium. Notice that the pith is absent in dicot roots . 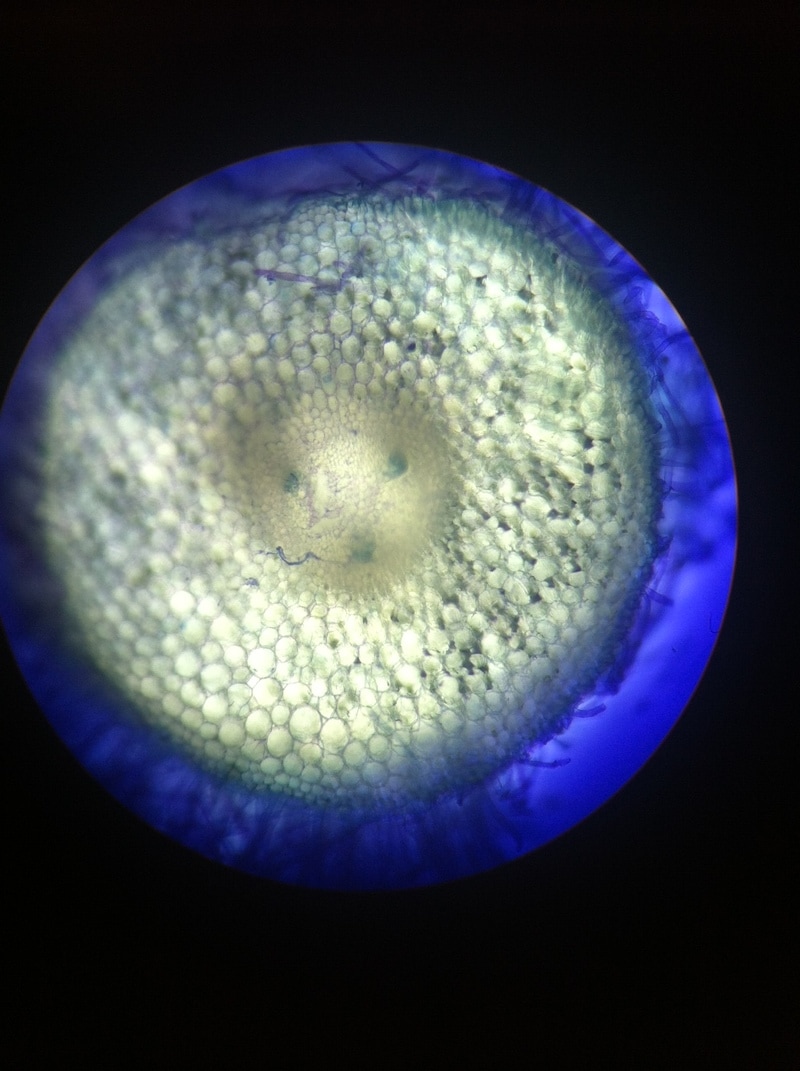 Cross section of Pisum Sativum root. 100x Mag. Stained with TBO. Slide prepared by Tyler Yates, Photographed by Cameron Ross  Annotated diagram of a dicot root In lab on Thursday February 16th we explored root structures of monocot and dicot roots. Our class examined a Corn plant to identify parts of the root. Monocot roots have adventitious roots where lateral roots give rise to fibrous roots. These type of roots do not have a primary root, but instead have many that branch out from the stem. Although the structure of the monocot and dicots are different, they still encompass the same internal anatomy. The image below on the left shows a picture of a Corn plant root through a microscope. The cross-section was stained with TBO and the microscope magnification is at 40x. The image on the right is a drawing of a monocot root with its labeled parts.
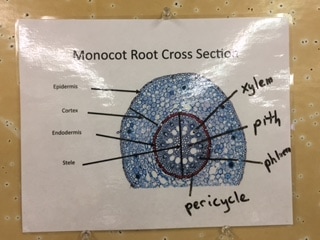 The third image is another example of a monocot root structure. The epidermis layer of cells is found the outermost edge of the root and is the same for both monocot and dicot roots. In from the epidermis is the exodermis layer of cells (not labeled in on the image). Next is the cortex, which is made up of all the cells between the exodermis and the endodermis. The endodermis is the first, outermost layer of dark cells. The next layer of dark cells in known as the pericycle. The the larger bubble looking circles are the xylem cells. Surrounding the xylem cells are the phloem cells. The pith is the innermost cells from the xylem cells. Lastly, the stele is the area inside the endodermis cells.
By Keira Mitchell |
AuthorContent is created by students participating in the Plant Structure course at Oregon State University for Winter 2017. Archives
March 2017
Categories
All
|
 RSS Feed
